


Expert Advice
-
My Solar Powered G Shock Has Stopped Working...
What Happened to my Solar Powered G-Shock???
Two nightmare scenarios for any Solar watch buyer:
1) It’s a pain isn’t it? You buy a watch, it’s solar powered so you don’t have to stuff around with the batteries, you open it up and it’s…. DEAD! WHAT HAPPENED?
2) You’ve had the watch for years, you never needed to replace the battery. You may have stopped wearing it for a while and when you put it on again, what happens? The watch won’t start, even after a few minutes in the sun! What do you do?
Both scenarios can have the same solutions, so don’t lose your head just yet.
First of all, there’s something you need to know about all Casio watches. When Casio builds each watch, before shipping it out all over the world, they put a test battery in, and test that the features are all working fine. After the tests, the battery is left inside and sealed to ensure water resistance. Now, here’s the problem – since the battery is left inside, and the watch switched on, it’s already draining. Now, that doesn’t mean the watch you’ll receive has a dead battery, but it won’t last as long as with a brand new battery (kind of like if you buy a printer and use the ink/laser cartridge that’s already there – you won’t print out as many pages as they promise until you get a brand new cartridge).
So let’s say either scenario 1 or 2 happens. Don’t panic. Put the watch on the windowsill and leave it exposed to the sun for about 3 days. That should do the trick (it’s also helpful when you get the low battery signal on your watch). Now, if this happens in scenario 2, you’ll want to also turn off the automatic backlight, so it doesn’t interfere with the charging.
Now, let’s say the watch is still dead after you left it in the sun for a few days. Unfortunately, that means your battery is faulty and you’ll need to get a new one. If your watch is still under warranty (or if you had just bought the watch and it’s already not working after the 3 days of charging), take it back to where you bought it from.
If the watch isn’t under warranty, then feel free to use this guide on how to change a watch battery. Remember, if you’re under warranty, do NOT do this, it’s only for watches out of warranty, as opening the back will void your warranty.
Until Next Time
Jimmy B
-
9 Interesting Facts About G Shocks
9 things you never knew about G-Shocks.
The G-Shock watches have been around for over 30 years. They’ve made a lot of models, with no sign of slowing down. Collectors know a lot about Casio watches, but even I was surprised to discover some of the things on this list!
1) Fox Fire VS Illuminator.
See, the Illuminator/backlight has been around pretty much as long as Casio, but in Japan for some reason it’s called the “Fox Fire”. Apparently though, that’s only because Foxfire is the term given to a glow, which is found on a fungus. Interestingly enough, said fungus was used in submarines as far back as 1775, thanks to a suggestion by Benjamin Franklin. Everywhere else in the world, the backlight is called the Illuminator, so PETA (or other animal lovers), there’s nothing to worry about – no foxes were harmed in the making of Casio Watches :)

2) They’re the go-to watch for the Navy Seals.In the US, the Navy seals used to get Rolexes, but obviously it cost way too much to repair. So back in the 1980s, they switched to analogue G-Shocks. These days you wouldn’t be surprised to see them wearing a Frogman or a Gulfmaster.

3) They’re worn by celebrities in movies. That one is Casey Affleck in “Triple 9” wearing a DW-6900MS-1. Everybody from Clint Eastwood, to Arnie can be found wearing G-Shocks in both movies and TV shows.

4) It’s all about the Screen Size.
If you’ve ever looked at digital watches, you’ll note that a majority have the time set to 10:58. There’s a perfectly valid reason for that. You see, those numbers take up the most space, so by photographing the watches reading 10:58, you’ll see the whole screen being used up, and it really emphasises the LCD display.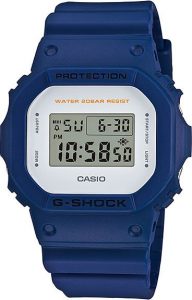
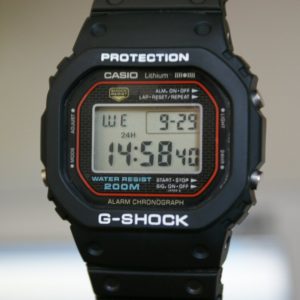
5) Only three original prototypes exist.In 1983, the very first G-Shock was called the DW-5000. Five of those prototypes were built, but as of 2017 only 3 remain. Those three were gifted to members of the original design team. Another interesting tidbit – the follow-up to this model, the DW-5500C was nicknamed the Mudman, due to its high resistance to mud. That name stuck around until the G-9000 and G-9300 series came out and took over the nickname.
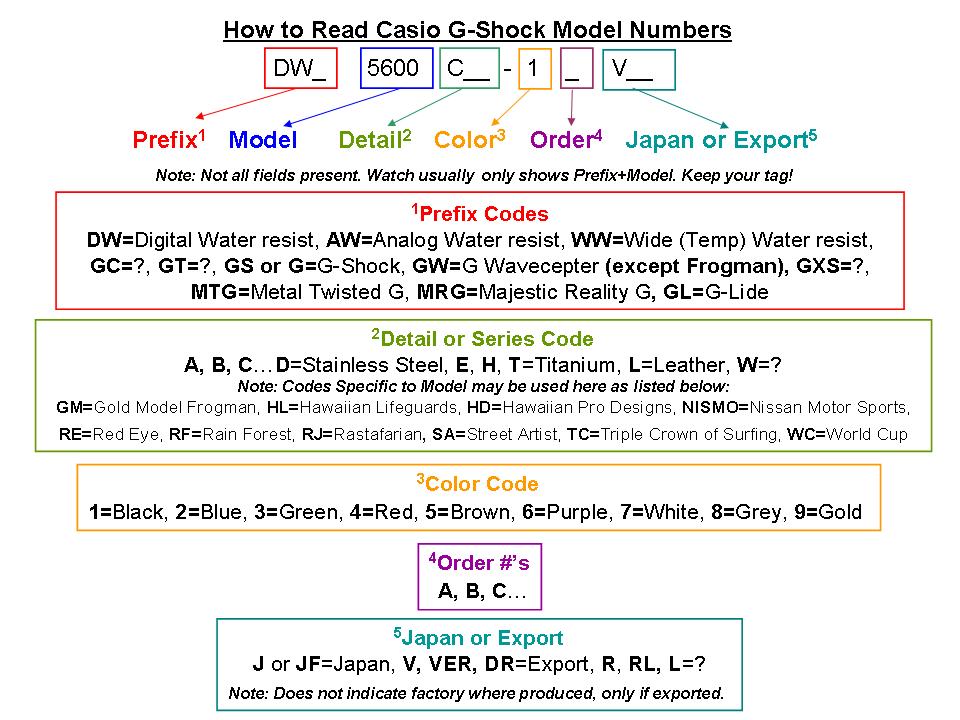
6. What do the codes mean?
A bit complicated I know, but this picture above shows exactly what the letters and numbers mean. For more information on this point, have a look at our previous article here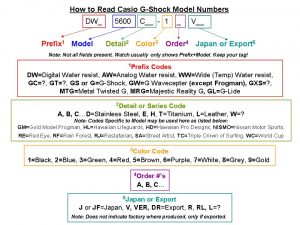
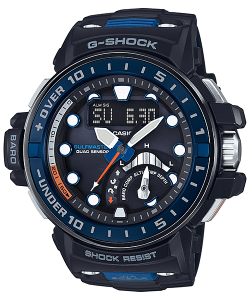
7) For years, the Frogman was the undisputed king of Casio’s Diving Watches… Until late last year when the GWN-Q1000 series came along.
The newest edition to the Gulfmasters included a depth sensor, along with improving the compass, barometer and other sensors to make them accurate even when the watch isn’t on a flat surface. To find out more about the Gulfmasters click here.
8) The G-Shock was inspired by a rubber ball. That’s right, something so simple inspired a watch that’s been around for almost 35 years! And it wouldn’t have happened if it wasn’t for an accident. You see, the creator of the G-Shock, Kikuo Ibe, was just an engineer working for Casio, when he dropped and broke a watch. Not just any watch though, this was a watch passed down from his father. Of course, a loss like that would be devastating to some, but for Ibe, this was motivation to build a stronger watch, so that what happened to him, wouldn’t happen to anybody else. He put together a team called “Team Tough” and his idea was for a “Triple Ten” watch. That’s a watch with 10-year battery, 10m shock resistance and 10 bar (which is 100m) water resistance.
As we know by now, he managed to exceed the 10m shock resistance since every watch made by Casio has a guaranteed 100m shock resistance! But back to the topic, Kikuo and his team used to throw prototypes out of a bathroom window for the 10m tests. As you can imagine, that resulted in a lot of broken watches. What changed? One time, Kikuo was looking out the window and saw a rubber ball being bounced at the park. That got him thinking, since the outer layer was absorbing all of the impact, the inside of the ball was protected. That became his inspiration, and it’s where the G in G-Shock came from (it stands for Gravity).
9) The creator of the G-Shocks only has two of them (and he can only wear one of them!). According to Kikuo Ibe, his favourite is the prototype that he received (the DW-5000). But since that’s up at the museum, he uses the DW-5600. That’s not just dedication, it’s proof that a good watch can last a lifetime!
I guess it’s true, you do learn something new every day!
Until Next Time
Jimmy B.
-
What Do the Casio Prefix Codes Mean?
Do you ever feel like you're getting a headache from all these numbers? Why do we need them? If you've ever looked at a model number and just went "Meh, too complicated!" Well, this article is just for you. Welcome to Jimmy B's guide to Casio, and today I'll be explaining what every part of a model name means, hopefully clearly enough that you can understand, and have a guide for next time.
Hang on... Can't I just look at the watch and see what colour it is? Well that's a good question. Thing is, some pictures on Casio's site are taken under a certain light, which could make a watch look either darker or brighter than it actually is. With my guide, all you'll have to do is take a peek and you'll know exactly what you're getting.
 First let me explain the colour code:
1= Black
2= Blue
3= Green
4= Red / Orange
5= Brown / Gold
6= Purple
7= White/Transparent
8= Grey/Silver
9= Yellow
So I'll give you an example. If you buy a GW-9400-1 watch, you know that the band will be black. If it was the GW-9400-3 it's green. Now, if there's a number after the A, that actually tells you the colour of the hands or display. So, like the earlier example, GA-100-1A2. That means it's a black watch, but the hands are blue.
Now, what about the DR? Well that's actually quite simple. When you buy a watch, the end will either be CR, DR, ER or JF. In order that means Chinese Export, Wide Distribution, Made in Europe, and Made in Japan. So, when you see DR models, those are the most common but if you see any of the other three, you better grab them up fast, because they're limited edition, and only a few are being made at a time!
I hope I've made things clear for you. If there's something you don't understand, then don't hesitate to leave a comment and I'll try to explain further.
Until Next Time
Jimmy B.
-
My G Shock Time is Wrong
Adjusting the Accuracy of a G-Shock Watch
Welcome back to the help column, now before I answer the question, I need to warn you guys: do not do this unless your watch is out of warranty. These instructions WILL void your warranty, so do this at your own risk, or wait until it’s out of warranty first. Got that? Good, let’s get started, by asking WHY we want to adjust the watch in the first place.
See, a lot of watches, not just G-Shocks, tend to lag after a while (years usually). 5/10 seconds is ok, but it all adds up. If you want to save some money, and would rather not go to a jeweler, it’s up to you, so these instructions should help you make your watch great again!
Before we get started, there’s a few items that you’ll need.: A back removal tool (such as a screwdriver), a stopwatch, a notepad to record your results (or use a computer so you don’t have to worry about the paper running out), a well as a site with a completely accurate time. Something like timeanddate.com, which uses an atomic clock.
Alright, I want to warn you beforehand, this WILL take a while (and I mean days) in order to get the best result.
So we don’t get too confused, the watch you’re trying to set will be Watch A.
First, go into a site such as timeanddate.com and set the watch to the exact time (up to the second). Then you need to figure out, just how much the watch is lagging. To do this, look at the site and take out your stopwatch. Wait until the seconds end in a 0 (so for example 9:31.00. As soon as it hits 0, start your stopwatch and look at watch A. Stop the stopwatch when watch A hits (in this example) 9:31.05 and have a look at it.
Now then, say the stopwatch says 9:31:05.25. That means, when you take away the 5 seconds, your watch is faster than the atomic clock by 25 milliseconds. If the stopwatch said 9:31:04.80 then it’s slower by 20 milliseconds. Now, you’re going to have to do this a few times if you want to find the exact number, so make sure you’re writing it down!
Once you’re sure you have the exact time difference between your watch and the atomic clock, leave your watch for 24 hours. That guarantees the best results. Set an alarm on your phone to remind you if you have to. Alright, so you’ve had a good rest, it’s been 24 hours, what next?
Remember the 9:31 test? You need to do it again. So back onto the computer, wait until it’s 9:31:00, start the stopwatch and stop it when watch A reaches 9:31.05. Now, say this time the stopwatch says 9:31:05.95. Not only is your watch faster by 0.25ms, it’s now added a further 0.70ms. At this point it’ll definitely be helpful to write down yesterday’s result as well as today’s, or you’re going to get REALLY confused.
Remember, write the date and time when you did the test, for the most accurate results.
Now comes the complicated part. What, you thought the test was complicated? Well now you’re going to unscrew the back of the watch, and play around with the gears (hence why I said at the start, make SURE that it’s out of warranty!).
Now, obviously I can’t see your watch, so here are a few pictures of what a Casio’s insides should look like, and WHERE you need to poke around.
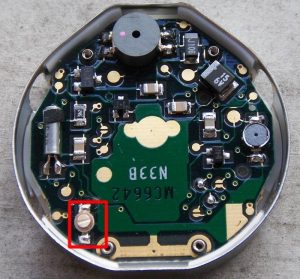
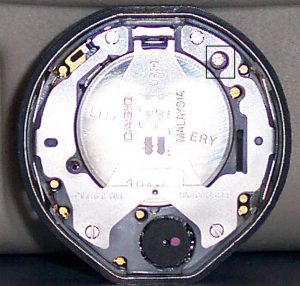
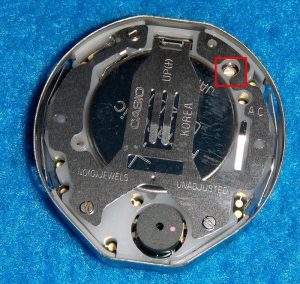
If you look closely, you’ll notice that the time screw is quite different from the one keeping the module from falling apart. Now, the good news here is, the screw is so distinctive, that if you look for it, you’ll be able to find it quickly, and there’s no need to take out the module.
Here’s where guesswork comes into play. You’ll need to either turn the screw clockwise or counterclockwise. Now, I’m not saying a huge turn, more like 1/16th to 1/32 of a turn. Wait 24 hours again, and perform the test again. If the watch gained any more time, then open it up again and turn the screw the other way. If it’s gotten better but not 100%, unscrew the watch again, and turn the screw a little more in the same direction. Keep doing that until the watch is as close to correct as possible (unless you’ve got lightning-like reflexes, you’ll never get the watch EXACT, but close enough means it’ll run smoothly for another few years. Just remember, for the best possible results, leave the watch for a few days, to a month. That way you’ll know just how much the watch is losing or gaining every month, and you’ll know how much to fiddle with the screw.
I hope you’ve found this helpful. Don’t forget to send me any questions. Until Next Time. Jimmy B
-
How Do I Set The Alarm on my Baby-G?
How do I set the alarm on a Baby-G watch?
There’s a LOT of Baby-G watches out there, some with just 1 alarm, some with up to 5 separate alarms. So how do we set them? And how do we turn them off afterwards? Well, you’re in luck because this is the topic of this FAQ. So if you’re ready, here we go!
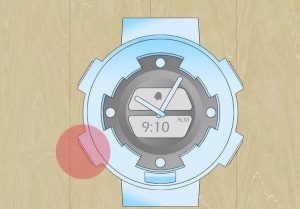
Before we start, I’d like you to look at your watch – specifically at the 4 buttons on the side. Label them A, B, C, and D per the picture below.
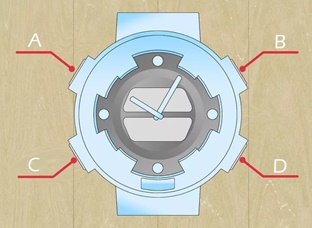
If your watch has a button at the bottom, we can call it L (these buttons aren’t on every watch, so most of the time you won’t even have to worry about it).
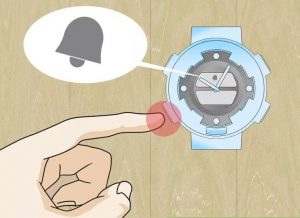
Got everything labeled? Then the next step is to press the C button four times. That’ll bring you to the alarm mode (you should know that you’re in the right place, because you’ll have the letters AL and a picture of an alarm clock at the top. If you’ve got multiple alarms, then it’ll be AL1
Now that you’re in the right mode, if you have no other alarms set up (and if you do, why are you reading this guide?), you can start setting the time. If AL1 is used up though, press D to go to AL2, then keep tapping it for AL3-5.
Right, so you’ve got the slot ready to go, next it’s time to set the time (if you’ll pardon the pun).
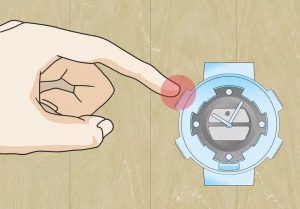
Hold down the A button until you hear a beep. If you look at the screen now, you should see some numbers flashing on the screen. In this case, the default would usually be 0:00 (or 12 AM for those unused to 24hr time). Press C once to switch between hours and minutes. You’ll know which ones you’re going to change, because that set of numbers will start flashing.
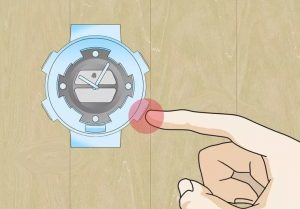
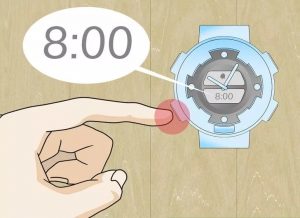
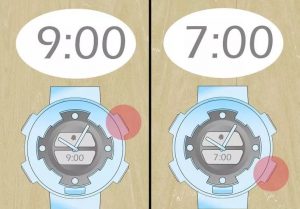
Now, say you want to change the alarm to ring at 7:30 am. First you need to press B 7 times (again this is assuming that the alarm is at 0:00). Press C to switch to minutes, and then hold B for a few seconds until you reach 30. If you’ve gone too far, that’s not a problem, simply press D a few times to take away the extra minutes.
Once you’re done, save the alarm by pressing A once.
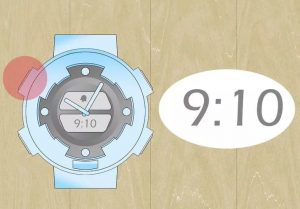
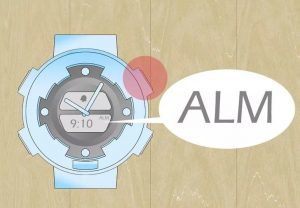
Now, here’s the last bit for this part. Have a look at the screen, and see if the words ALM are on. If they are, that means your alarm is working. If not, simply press B while you’re still on the screen, and the alarm should switch on.
Now that you’ve done that, press C a few times, until you’re back to the timekeeping screen.
So, now that we’ve done this, the next step is to turn the alarm off (so it doesn’t wake you up every morning at 7:30 am.
Don’t worry though, that part is a lot less complicated. All you need to do, is go back to the alarm mode, and press B to turn the alarm off. That’s it!
Well I hope I’ve made your lives a little easier. Until Next Time – Jimmy B.
-
Are Casio G-Shock Watches/Baby-Gs Saltwater and Chlorine Proof?
Through my many years of playing with G-Shocks, people have been sending quite a lot of questions, so for today’s column, I thought I’d answer one of the most frequent. Now, unlike what you’d usually find in a FAQ, this isn’t going to be a one or two sentence answer, so hopefully it will satisfy even the most curious researchers.
To answer this question, I decided to use both a 100m and 200m water resistant watches to see whether there was any difference.
Firstly, I went over to a local beach, and jumped straight in the water.
The 100m watch that I used was the BA-110-7A1. I had a bit of a swim (20 minutes) while wearing the watch, and there was no water inside the display (which means the seal stayed intact the whole time).
I then tested my BG-169R-7C, which is 200m water resistant. Same time in the water, same result. So far so good!
Then to perform the chlorine test, I went to a swimming pool with a deep 3m max depth to ensure there was maximum pressure applied to the watches. In this case I used the GA-110TP-7A for the 200m water resist test, and the BA-120LP-1A for the 100m water resist test. Both watches got a similar workout, and I even stayed around a bit longer.
Please note: While you may notice some condensation, when you first get out of the pool - you just need to wipe off the display. The reason for the condensation is the atmosphere change, and it goes away within minutes to an hour tops.
One unfortunate thing that I noticed when I got home though, the band on the BA-110-7A1 was a little dirty (the water at the beach wasn't the cleanest you could ever find). While it is scratch resistant, it can get dirty. This is especially noticeable if the watch is light coloured. Luckily, most dirt can easily be cleaned up using plain water. If you want to find out more about cleaning your Casio Watch, click here for our expert guide.
Hope this answered your questions, feel free to email us if you have any more inquiries.
Until Next Time!
Jimmy B
-
Apple Watch VS G-Shock
Smart Watches. They seem to be all the rage these days, but are the features really worth the premium you’d pay compared to your average G-Shock watch? Well, I bought an Apple Watch to test it out, and my first reaction was… “Meh”… Why? Well, keep on reading and let Jimmy B educate you.
Now, let’s just start off with some good stuff (I have to be unbiased after all). The watch is thin and light… Oh and the numbers on the display are pretty big, making it easy to read the time. You can also check and dismiss any incoming notifications without having to take the phone out of your pocket. Unfortunately, that’s about all that’s good about the Apple Watch. Now on to the bad.
First of all, the setup. In a G-Shock, depending on how basic it is you just have to set the time, your city code, and if it’s a Tide watch, your location to get the correct information. 5 Minutes tops it took me. The Apple Watch (once it’s actually fully charged [and don’t you just “love” having to do that before you can even start using the watch?]) took me 20 minutes just to set everything up. I had to connect it to the Bluetooth, set up SMS messages so that I’d see them on the watch, set it up so I could get calls… And after all that I could final continue with my day, knowing I wouldn’t need even half the features that I set up (but needing to set them up in the first place just so the watch would actually show me the time).
OK, you might be thinking that I’m complaining over nothing – after all, computers take a while to set up as well. You may be right, so let’s just continue with my experiences. When you have a normal G-Shock, you press a button, go to the stopwatch, and use that to help you with your training. Basic, efficient, and it works. Apple (in their infinite wisdom) decided to introduce the “Activity Tracker”. In theory, it’s a great little program that tells you how many calories you’ve burned, and a way to keep you moving forward towards your goals. In practice? It turns on automatically pretty much every time you move your wrist above your waist. So if you need to scratch your head, or nose, the tracker thinks you’ve just started exercising (and that can drain your battery really quickly).
Now, remember how I said you could dismiss any notifications without taking the phone out? That’s all well and good, but let’s face it, we’re practically buried by notifications on our smart phones. My iPhone sends me Facebook notifications, changes to the weather report, incoming emails (of which I get 20-30 a day!), so every single time this happens, the watch either vibrates or beeps, distracting me from work. And even if I mute it, the display on the watch, when I do look at it, will say “You have 20 new messages” forcing me to either ignore them and risk drowning in more, or reading them all and distracting me from work. Personally, I’d rather keep the phone and the watch separate.
Lastly I want to warn all of you. When a person buys a watch, that style should be timeless. It should be a reflection of who you are and why you bought this particular watch. A smart watch (like a smartphone) changes designs practically every year, and they make it so some software won’t even work on an older watch. So if you bought yourself a smart watch, you’d have to keep paying obscene amounts of money every year or two. A G-Shock would last you a lot longer, and you might just need to shell out some money for repairs, but nowhere near the amount of money as for an Apple Watch.
So, it’s up to you guys, but personally, I’m asking for a refund. To me, a G-Shock beats an Apple Watch any day of the week.
Until Next Time – Jimmy B.
-
White Baby-G Watch Turning Yellow from Staining? How to Guide
Is your White Baby-G Watch Turning Yellow from Staining? Here's How To Fix It!
Don't you just hate when you purchase a watch, and after a while, the band starts to look like it's been dipped in mustard? Unfortunately that happens more often than you think, especially with white watches. What's worse, this isn't covered by Casio warranty, as they consider it normal. So what can you do? Well, this is what my quick and simple guide is for. So, if you're ready to get your watch back into shape, read on!
Now, first thing first, you gotta ask, WHY does this happen? The answer is both simple and complicated - you see, Casio uses Resin in order to make the band scratch and tear resistant. Unfortunately, the way resin behaves, especially white resin, is sweat and even light can discolour it. And I'm not just talking about sunlight. Fluorescent light can discolour it as well.
There are ways to avoid the yellowing for as long as possible, such as keeping your wrist, and the watch, dry. but let's face it, if you've got a Casio watch, chances are you're an active person.
Luckily there's a very easy way of cleaning the band, so your watch will go back to looking pristine!
First up, get a soft cloth. Moisten it with water that's mixed with a soft detergent. Not dishwashing liquid, cos that's a little too corrosive, but something soft (worst comes to worst, just put some soap into the water dip the cloth into that.
Gently wipe away at the stains, and they SHOULD come off pretty easily. You can exert a little bit of pressure but not too much. If you don't see this making a difference, move on to plan B.
Grab some Hydrogen Peroxide (make sure you use the 3% solution). Spray the solution onto the yellow areas, then let it sit overnight before you try scrubbing. Repeat as needed over a few days and the stains should vanish.
Oh, and we have had some people complain that there's a smudge like pattern on the band after cleaning the watch. Don't worry about this, as you can simply wipe it off too.
Well, there you have it, an easy way to turn your yellow resin band back to its pristine white!
Until Next Time - Jimmy B
-
Changing a Watch Band - G-Shock/Baby-G Watch
Equipment Needed:
Microfibre Cloth
Flat spring-bar tool
Method:
Place the watch face-down on your micro Fiber cloth.
See the two thin metal bars, right next to the face of the watch, they are holding the band onto your watch. Some Casio watches, cover the spring bars to look nice,which makes it a touch harder, but not impossible
Using the forked spring-bar removal tool, gently push against one end of the spring bar. The bar should "spring" in and release.
Carefully pull the band from the watch, remembering to keep the spring bars, as these go into your new watch band. (unless of course these are broken, in which case you will need to replace you spring bars)
Now your ready to attach to the new band, push the old spring bars into your new watch band, just make sure its the correct way up, and that the buckle is on the correct side (left).
Using your fingers, gently push one end of the spring bar into the small groove in the watch face. You will need to use your tool to contract the spring bar, and you will feel it click into place.
This may seem like a daunting task, however once you have done it once, you will easily do it again and again!
-
Cleaning Your G Shock
Watches are worn on your wrist almost every day, and they can quickly build up alot of dirt and grime, especially in the little nooks and cranny's that you just can reach.
Today were going to give a brief run down
of the best way to give your watch a spruce up =)
Your going to need some warm soapy water, a soft cloth, a towel and an old toothbrush or other small brush (Nothing metal though)
The best way to clean your watch is to remove the band first. Please refer to our guide here on how to remove the band HERE
Once the band has been removed you can easily see all the grime and dust that has built up on your watch.
Pop the band into your bowl of warm soapy water, and remove it after about ten minutes. By then all the hard stuff should have soften up a heap, and you can now use your soft cloth and brush to remove all dirt and stains.
Be very careful however not to scratch any surfaces.
Make sure you towel dry your watch and band as much as possible before reapplying the band, using the tutorial above.
Your watch should now be looking fine and fresh, and ready for another day.
- Page < Prev
- Page 1
- Page 2
- You're currently reading page 3
- Page 4
- Page Next >