


How Do I Set Up My New G-Steel Casio Watch?
How do I set up my G-Steel Casio Watch?
So, you went out (hopefully to our site) and bought yourself a G-Steel? Congratulations, you've got yourself one of the toughest watches in Casio's range. Now, how do you set it up? That, dear readers, is a really common question, and one that I'm devoting this entire article to. Ready to get started? Here we go!
First up, I will be using the GST-S110D-1A as my example, but pretty much all the G-Steels can be set up the exact same way. To save time, instead of saying top right button, bottom left, etc, I'll be calling them A, B, C and D. A is the top left (also known as the adjust button), B is top right, C is bottom left, and D is bottom right.
The watch is an analogue/digital combo which will allow you to read the time off the digital display, if you're having trouble reading the hands.
So, first things first, let's open this baby up. If you live in VIC or NSW, congrats, you literally don't need to do anything else, since it's already set to Sydney time. But that's being a bit unfair to customers in other cities, so let's carry on.
Take a look at the bottom of the screen. Do you see the Letter H, or M? If so, that means your watch is charged up and ready to go, otherwise you'll want to leave it near a light source for a while (depending on if it's natural light or artificial light, it could take anywhere from just over 24 hours, to over 100 hours. Don't worry though, it doesn't have to be all at once. As long as the watch is seeing some light, you're getting enough power to run its functions.
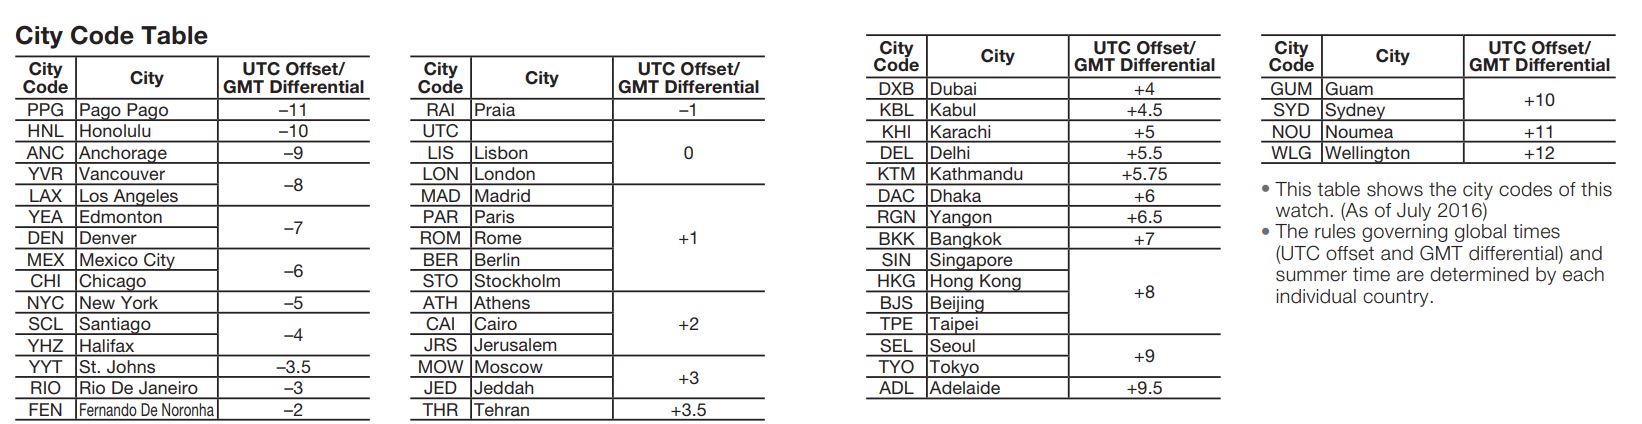
Next up, wed're going to check your home city, mainly because if the wrong home city is set, the rest of the world time will also be wrong. So when you're ready, hold down A for two seconds, until you see ADJ appear in the right digital dial. Let go right away, you don't want to hold on to A too long (more on that later in the article).
So, when you've let go, you'll see the city code replace ADJ, while the left dial reads SET. Use the B and D buttons to set the correct city code. To help you out I've put the table below as a handy guide.
Now then, we've fixed your city code, and we need to press C and you'll see the DST (Daylight Savings Time) indicator flashing in the left dial, while the right one will have either on or off. Press D to change it if you need to.
If that's all you need to do, great. But if you want to change the time, press C aagain. That'll ask you if you want the watch to show the time in a 12 or 24 hour format. Press it again to adjust the seconds (though not many people bother adjusting the seconds). Again will finally let you adjust part of what you need (the hours), and then Pressing C one more time will adjust the minutes. To adjust said parts, simply press B or D. Word of advice though, if you're in the 12 hour mode function, and it's evening, make sure the digital time has P or PM next to it. You don't want to know how many people have come to us saying their alarms aren't working, when it's only because they set the time to AM instead of PM.
You're almost done, bear with me for a few more minutes (and be thankful I'm not the manual, which repeats the same steps over and over till you're sick of looking at it)! Once you've set up the time, you need to set the date. Basically the same instructions, press C (assuming you just finished adjusting the minutes) and press B or D to change Year, repeat for Month and repeat again for Day.
WAIT! Don't press A just yet. If you want, you can now press C again to adjust whether the buttons make a tone, and then how long the backlight will stay lit for. Adjust those if you'd like, or just press A to finalise the time.
Now, let's talk fun features. These are modes designed to make life easy for both novices and pros.
First up, the G-Steels come with a REALLY cool feature, called Hand Shift. Use this if you want to read the digital time, and you find the hands are getting in the way. Just keep in mind, if the battery power is low, the hands won't move. Alright, if you're in the timekeeping mode (the default mode), press and hold C for a few seconds until you see the word HAND appear in the digital dial. Let go of C and the hands will move away from the digital screen, settling at 11:55.
Not to worry though. All you need to do to bring the hands back is press the C button again for two seconds (Until Hands appears). Otherwise, they'll go back on their own after an hour.
Here's the thing though, in rare cases, either a bump, or magneic interference, can cause the analogue hands to lag a little bit, and unsync from the digital display. There's a really easy fix to it though. Remember at the start I told you to only hold A for 2 seconds and not too much longer? Well, if you hold it for 5-7 Seconds, you'll see a different menu come up, with the heading H.Set in the right digital dial. So don't release the button when you see ADJ, wait till H.Set
What you'll want to do, is release the button, and press D or B to move the hands to 12 o'clock (that's their home position). Now press A and the hands will automatically sync back up with the digital display. It's that easy!
Now, one last tip before I end this mammoth article (which I'm hoping is easier to understand than the tiny manual). Alright, so this will probably only be relevant to people who like to go travelling overseas. You can actually swap the home time around with the international time! So as long as your home time was correct, all you need to do is press a button, and it'll show you the time where you're staying, until you swap the times around again.
OK, so what you'll need to do is press C once. Don't hold, just press. See the city that keeps flashing? Press D to cycle through until you get the one that you want as your new home city. Now, hold A and B together for a few seconds, until the watch beeps, and there you have it! You're now living in New York Time, or Tokyo, or whichever city you chose.
Well, that's enough of me yammering on. I hope this was helpful to you, and don't forget to send us your suggestions for more helpful article topics!
Until Next Time - Jimmy B